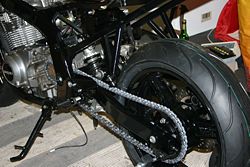
SV 650 rim in original rocker
Aus das GS 500 Wiki: www.GS-500.info
| Author: Goose, Translation: Herby |
Here I explain how to fit a fat rear wheel into the GS rocker.
This customisation should work for the GS 500 E as well as for the new models GS 500 and GS 500 F.
Inhaltsverzeichnis |
Parts list
- Rim of SV 650 from 1999 - 2002
- One 160/60 ZR17 rear tyre of your choice
- Brake anchor of SV 650 1999 - 2002
- Brake calliper of GS 500 E/F
- Brake disc SV 650 or B6, B12, RF 600/900 etc. (all 240mm discs with 5 hole fixing)
- 5 brake disc screws of the SV 650 or B6, B12, RF 600/900 etc., the GS ones don't fit.
- Brake anchor rod of GS or SV etc. (as it will be welded to measure it makes no difference)
- Spacer on the side where is the brake of SV 650 or GS 500 E/F is always the same
- Chain wheel mount of GS with inner distance of GS
- Spacer on the chain wheel side of the GS 500 E/F
- Spacer under the chain wheel mount, 3 mm (see picture)
- Spacer ring 25 x 35 x 3 mm
- Sprocket of ER-5 with 3 mm offset in engines manufactured up to and including 1993; for the models from 1994 onward, use the ER-5 sprocket with 3 mm offset and insert a 3 mm (No.11) spacer ring between the sprocket and the distance ring next to it.
The nice thing about this customisation is that it works like a tyre change with the sole exception of the brake anchor rod that has to be specially fitted. Everything else fits Plug & Play.
Costs
- Rim with tyre ca. 150 Euro/ 112.53 GBP.
- Spacer under the chain ring, 8 Euro/6 GBP.
- Sprocket ER- 5 with 3 mm offset and fittingly eroded 29 Euro/ 21.76 GBP
- Spacer ring ca. 5 Euro/ 3.75 GBP
- TÜV/ Technical Inspection Agency fee (I leave this open)
- Changing the vehicle documents with new certificate 21 Euro/ 15.75 GBP.
This adds up to about 210 Euro/ 157.54 GBP plus TÜV/ Technical Inspection Agency, but what you’ll have to pay in the end depends largely on how savvy you are with eBay. The TÜV is obviously only applicable in Germany, check with your local authorities for prices.
Customisation instruction
Dismount rear wheel and put aside the above-mentioned parts.
We begin with the chain wheel mount. Screw the chain wheel off of the mount and place the 3 mm distance ring between the chain ring and the chain wheel mount. Make sure the screws really grip the nut well. As a precaution you may apply screw lock.
Next you exchange the sprocket at the motor on the transmission output shaft and insert the distance ring No. 11. How to do that, you’ll see in the repair instructions.
In its place other sprockets of different sizes can be used, as the ER-5 sprocket is available with 15, 16 and 17 cogs.
Now you assemble the rim of the SV, that is to say you attach the brake disk and press the chain wheel mount into the rubbers (spray beforehand a little WD-40 or a similar product from underneath on the 5 feet). Watch that it fits well, otherwise you’ll have to cram parts.
When the rim is ready, fit it into the rocker, with the spacer on the side of the brake anchor and the brake anchor itself and the spacer on the side of the chain wheel, just as you do when mounting an ordinary rear wheel.
Pull the axle tight, position the tyre straight and tighten the chain as usual. As you work with parts of the GS, the chain is to be tightened as described in the manual.
Except for the brake anchor rod this looks as follows:
Here is a picture of the rod that was used and registered by the Technical Inspection Agency in the customisation of theGrinch:
Once you have finished this, mount the brake anchor rod, and everything’s ready for the test drive.
As regards the Technical Inspection Agency entry you should first consult them. In my case they didn’t have any objections against 2-3 mm of space between chain and tyre, but they know I’m good at welding and approve of such brake anchor rods, though all depends on the inspector you deal with.
Of course, you can have your brake anchor rod made at a metalwork shop, with a nicely done welding seam, but that’ll cost.
This is what it looks like once registered:


